iPhones come fully packed with a very helpful feature known as auto-brightness, designed to adapt the screen’s brightness to match your current surroundings. Whether you’re enjoying the sunlight or sitting in a well-lit room, the display intensifies accordingly. Conversely, it dims in low-light environments. Yet if your iPhone’s screen fails to automatically adjust it’s brightness based on the ambient conditions, then you might find yourself frequently making manual adjustments.
To sort out this inconvenience, it’s crucial to troubleshoot the root cause behind the malfunctioning auto-brightness. To save you time from exhaustive checks, I present here a handful of solutions aimed at rectifying the issue of auto-brightness not functioning as expected on your iPhone.
Fix Auto Brightness Not Working on iPhone
The auto-brightness functionality proves to be a remarkable asset as it eradicates the need for the constant manual tweaking of your screen’s brightness whenever your surroundings change. This not only brings about convenience but also conserves your device’s battery life by averting the continuous use of the highest nit brightness setting.
In instances where your iPhone declines to engage the Auto-Brightness mode, several factors might contribute to this occurrence. It becomes crucial to inspect specific settings to determine whether this feature has been activated or deactivated. Moreover, the overall software experience and supplementary attributes can play a role in influencing the effectiveness of this feature. Explore the following 12 solutions to address and rectify this matter effectively.
1. Try Removing the iPhone Screen Protector
Caring for our iPhone screen is of utmost importance, as a cracked display can lead to significant expenses for replacement. However, the choice of a screen protector shouldn’t lean toward cheaper options. When confronted with Auto-Brightness issues, it might be worth contemplating the replacement of the glass protector on your iPhone’s splendid screen.
To diagnose the problem, start by removing the screen protector and observing if your device seamlessly adjusts its brightness in response to varying lighting conditions. A successful adjustment post-protector removal pinpoints the issue. To avoid such concerns, opt for a premium screen protector from a reputable brand that enjoys a positive reputation among users. This judicious choice ensures both protection and optimal device functionality.
2. Toggle Off and On Auto-Brightness on iPhone
Suppose your iPhone currently possesses this activated function. An effective step to consider involves toggling off and on the feature, initiating a reset that could potentially alleviate temporary concerns.
For the majority of smartphones, accessing Auto-Brightness is conveniently achievable through the Control Centre or Quick Settings panel. Meanwhile, iPhones house this feature within the device settings. This strategic placement ensures straightforward management and optimization.
Follow the simple steps mentioned below:
1- Open the Settings app on your gadget.
2- Access the Accessibility settings.
3- Choose Display & Text Size under Vision settings.

4- Scroll down and switch off the Auto-Brightness Once you switch it on again, observe how the screen brightness adjusts based on surrounding light conditions.
By adhering to these simple instructions, you can easily control and optimize your screen’s brightness experience.
3. Wipe the iPhone Notch Area
The tiny yet crucial sensor nestled within your iPhone’s notch can sometimes lead to Auto-Brightness issues if it becomes dirty or oily. Accumulated sweat, body oils, and dust can impede the sensor’s effectiveness in adjusting brightness based on ambient light. To ensure seamless Auto-Brightness operation, it’s important to routinely clean this sensor.

A gentle wipe of the iPhone Notch area (located at the top of the display) with a slightly damp cloth is recommended. Following this cleaning process, you’ll likely observe the Auto-Brightness feature on your iPhone functioning as intended. This straightforward maintenance routine not only restores optimal Auto-Brightness performance but also enhances your overall user experience.
4. Restart Your iPhone
In the event of a temporary iPhone screen brightness issue, this straightforward method is likely to provide an immediate solution. Rebooting your iOS device holds the key to eliminating glitches, enhancing iPhone speed, and optimizing overall performance. Follow these uncomplicated steps to initiate a device reboot:
1- Simultaneously press and hold the Lock button along with either of the volume buttons. For iPhones equipped with a Home button, simply press and hold the Lock button.

2- Subsequently, a “slide to power off” prompt will emerge on your display. Swipe right on the slider to power down your iPhone.
3- Allow a minute to pass before pressing and holding the same Lock button to initiate the device restart.
Upon successfully rebooting your iPhone, proceed to various lighting environments to evaluate the Auto-Brightness intensity. You will readily observe its restoration and functionality once more. This effective technique ensures swift resolution for transient screen brightness concerns on your iPhone.
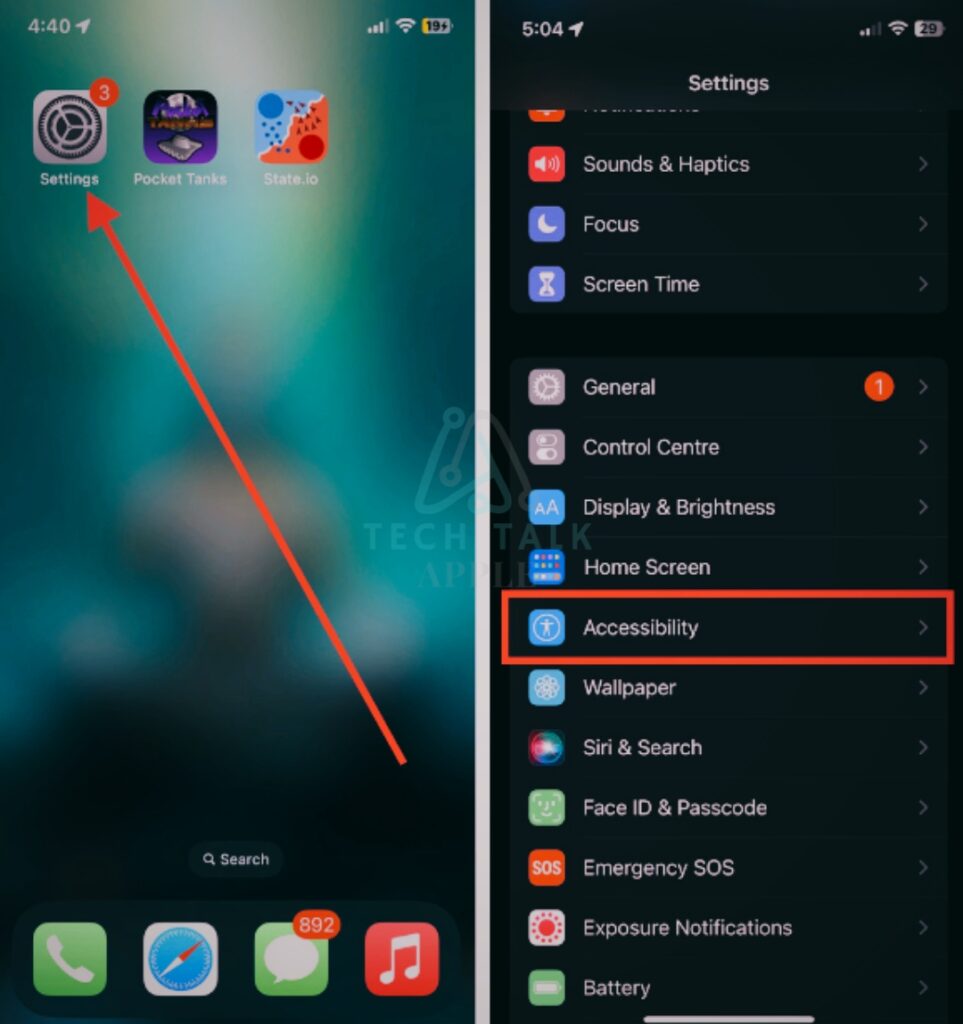
5. Turn Off Low Light Mode
A considerable portion of iPhone users may not have discovered the existence of this particular functionality. Low Light Mode represents one of the Accessibility attributes, similar to the Auto-Brightness function. If you find that the brightness feature isn’t functioning as expected, it could be advantageous to explore the option of deactivating Low Light Mode. The subsequent steps outline a straightforward process to achieve this:
1- Initiate the Settings application and access the section dedicated to Accessibility.
2- From there, navigate to the Zoom settings.
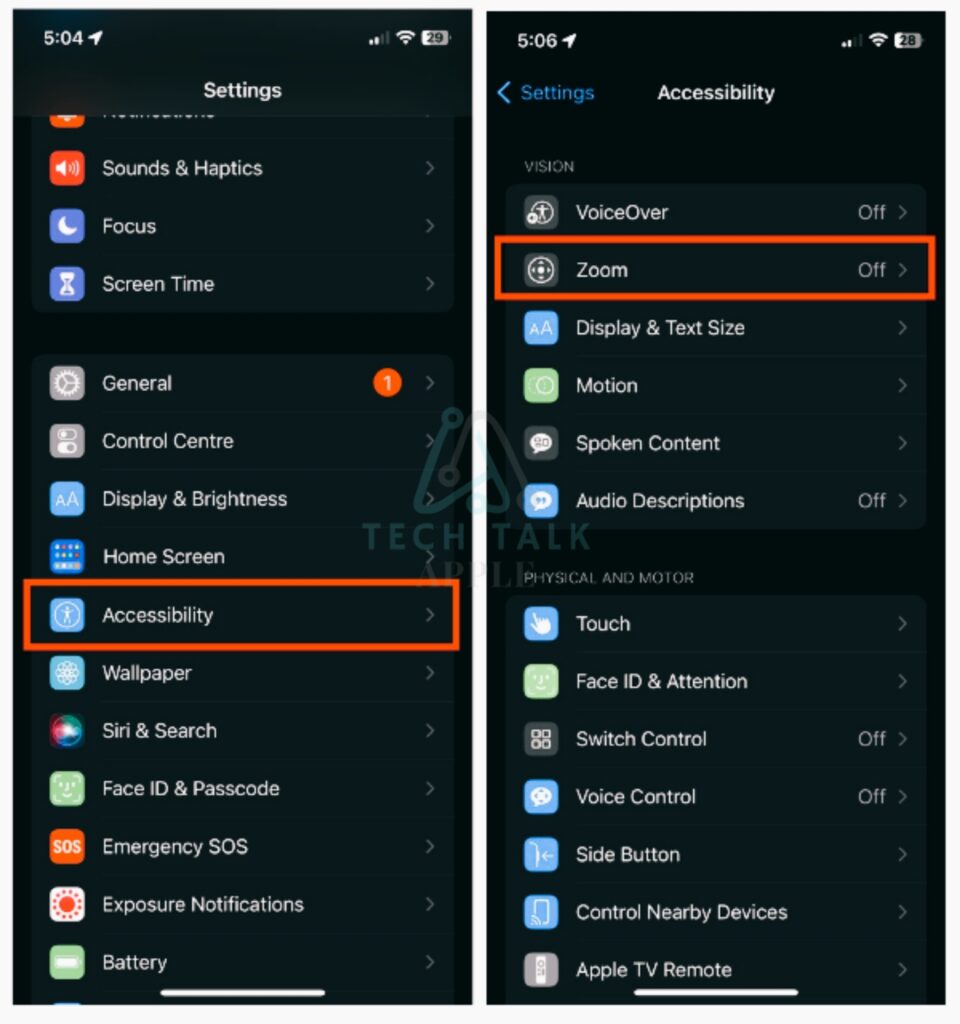
3- Proceed to the Zoom Filter category.
4- Opt for the “None” option to finalize the adjustment.
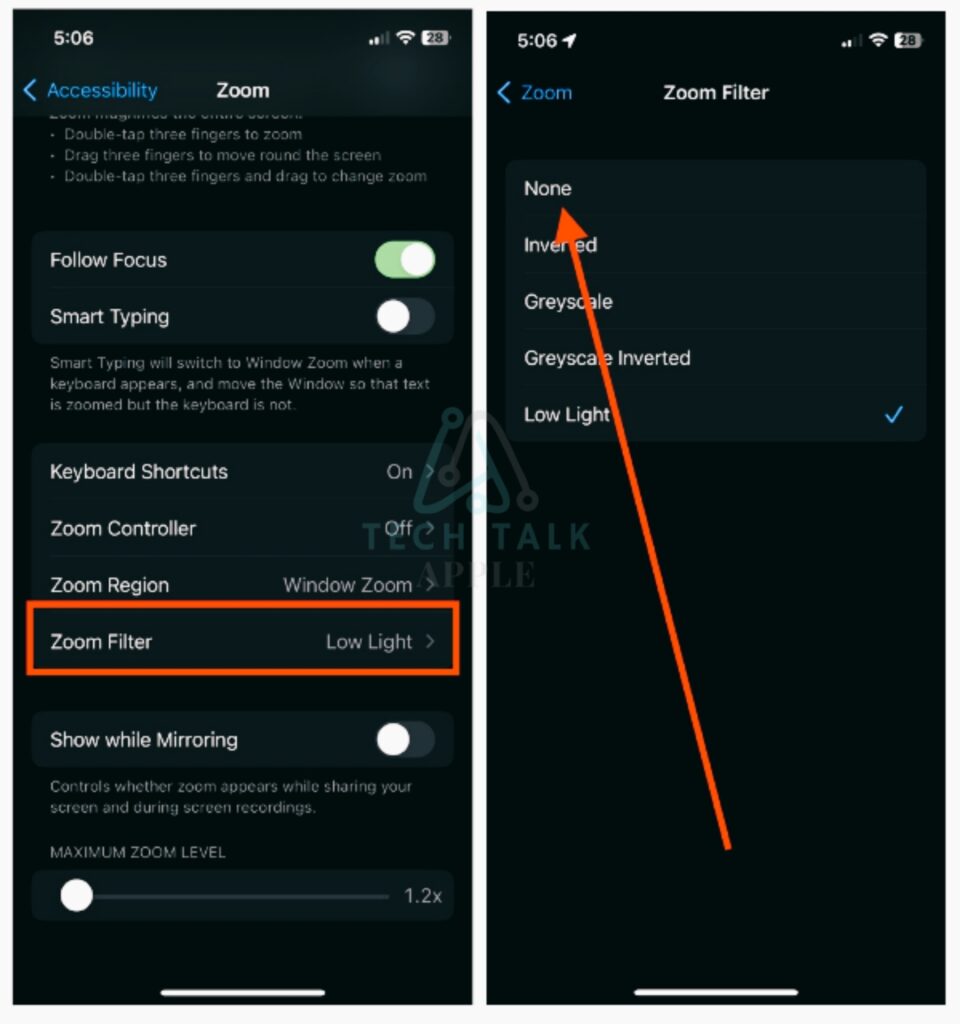
Disabling Low Light Mode allows you to retain the benefits of the Zoom magnifier while reinstating the use of the Auto-Brightness feature after its deactivation.
6. Try After Disabling the Night Shift Feature
As the sun sets, you have the option to impart a warmer tone to your display, ensuring a gentle experience for your eyes using Night Shift. Particularly valuable for individuals who extensively use their iPhones both day and night, this feature can, at times, lead to disruptions in the functioning of Auto-Brightness. To address this, consider deactivating Night Shift temporarily to assess its impact:
1- Launch the Settings app on your device.
2- Navigate to the Display & Brightness settings.
3- Locate and select the Night Shift option.
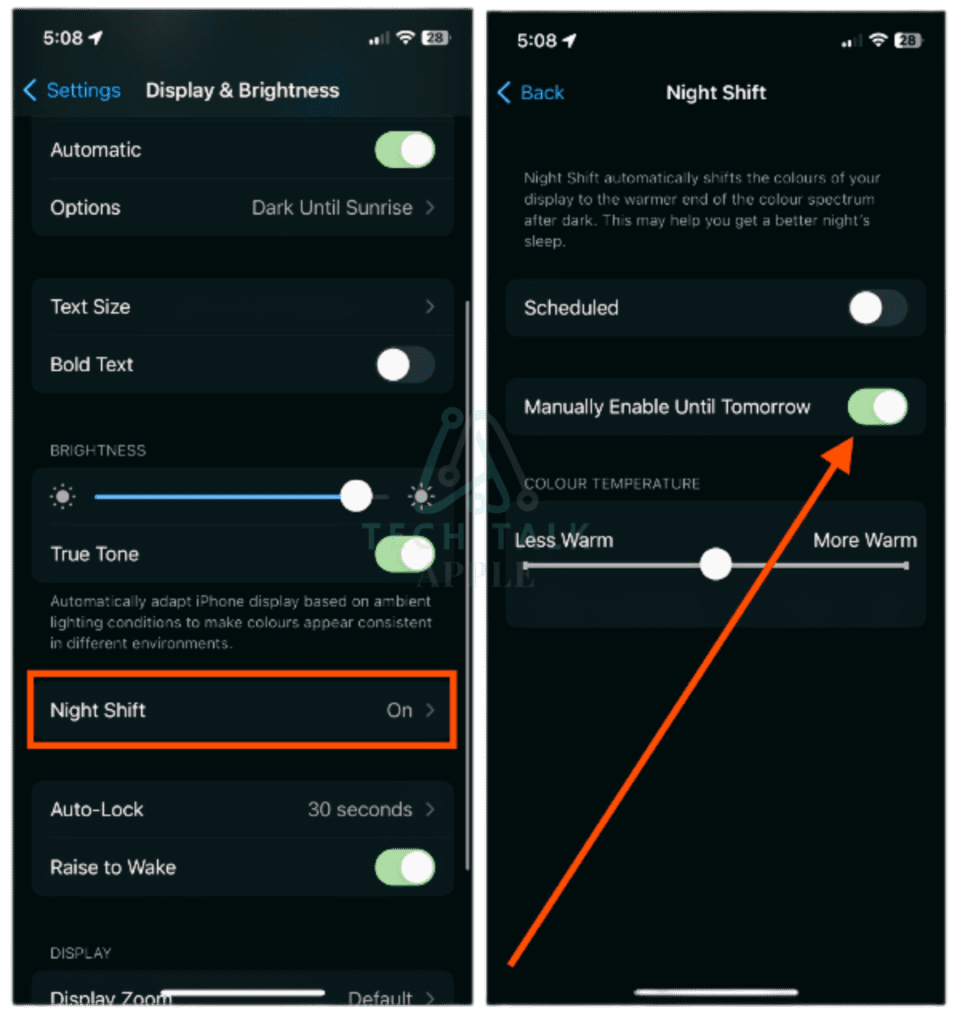
4- Finally, toggle off the switch for either Scheduled or Manually Enable Until Tomorrow, based on your preference.
By following these straightforward steps, you can potentially resolve any issues concerning the interaction between Night Shift and Auto-Brightness on your iPhone, ensuring a seamless and visually comfortable experience, day and night.
7. Update to the Latest iOS Version to Fix Auto-Brightness
Numerous users have shared instances of Auto-Brightness disruptions attributed to outdated iOS versions. Addressing this concern often involves updating to the latest iOS iteration, proving effective in resolving a range of issues, including those related to brightness control. If your device has yet to undergo an update, it’s advisable to initiate the process:
1- Launch the Settings application on your device.
2- Access the General settings section.
3- Proceed to the Software Update option.
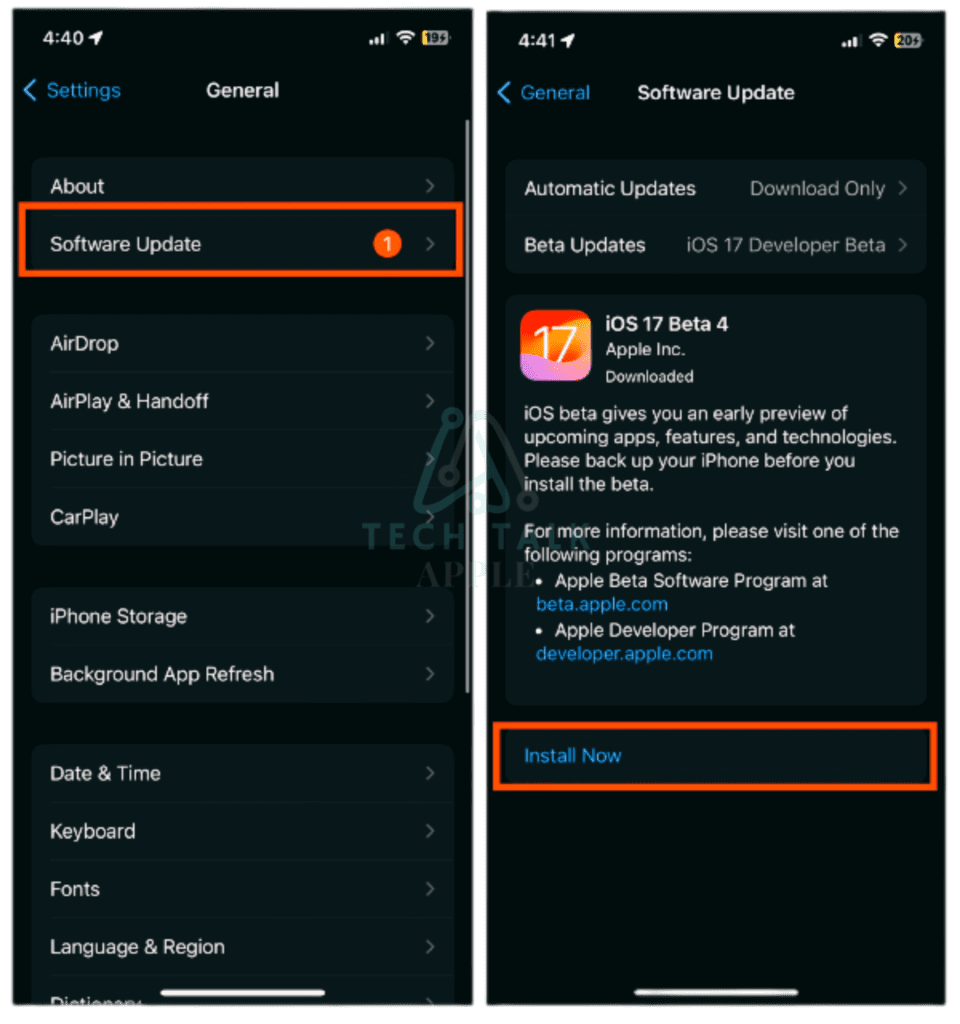
4- Conclude by selecting the Download and Install option to initiate the update procedure.
Your iPhone will commence the iOS update download, followed by an automatic restart upon completion. Subsequently, assess the proper functionality of Auto-Brightness and other features. By adhering to these uncomplicated steps, you can potentially rectify Auto-Brightness irregularities stemming from outdated iOS versions, ensuring the optimal performance of various features on your iPhone.
8. Try Turning Off True Tone
To ensure a thorough resolution for the Auto-Brightness concern, let’s consider temporarily deactivating this feature. iPhones come equipped with a default function known as True Tone, designed to intelligently adjust screen color and brightness based on surrounding lighting conditions. For potential troubleshooting, follow these steps to disable True Tone:
1- Begin by launching the Settings app and navigating to the Display & Brightness section.
2- Look for the True Tone option within the Brightness settings. Simply toggle the switch to turn off the True Tone feature.
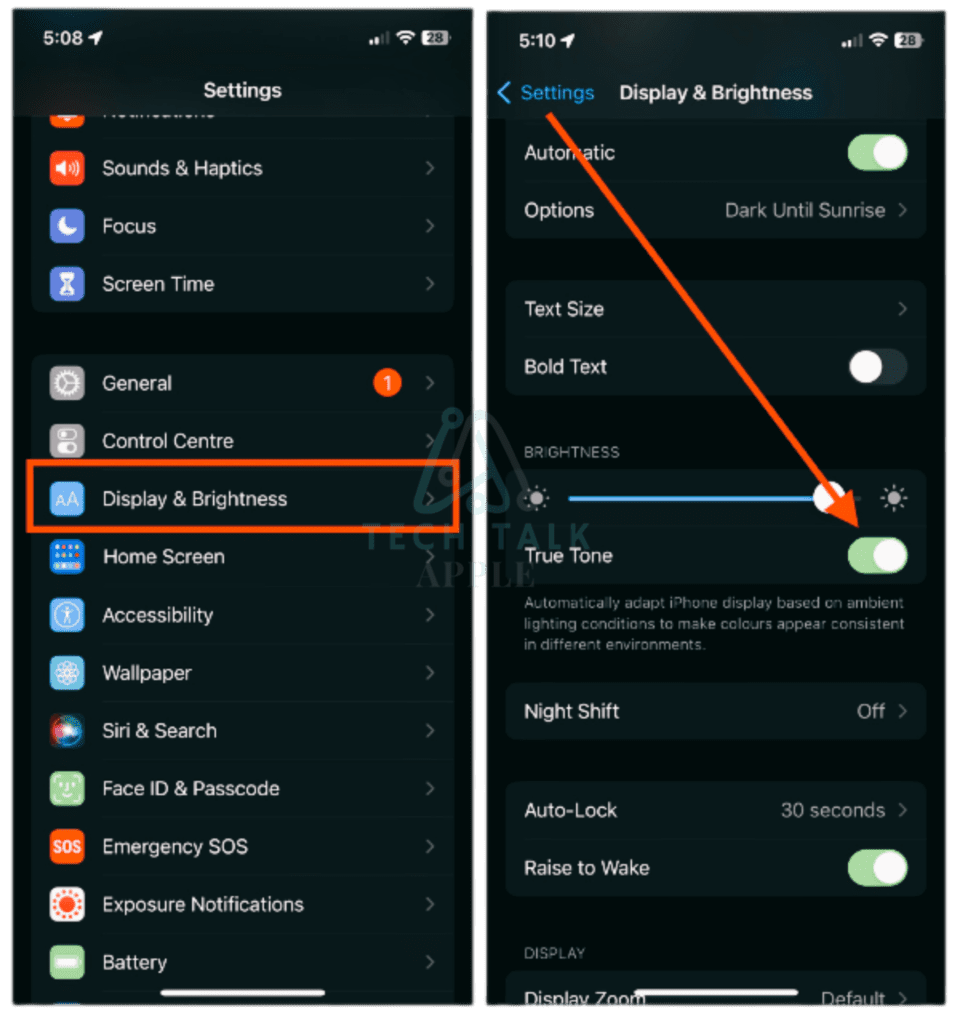
3- After completing this step, proceed to experiment by first disabling and then re-enabling the Auto-Brightness feature. This will help us gauge whether the issue is effectively resolved.
By adhering to these guidelines, you’re embracing a comprehensive approach towards resolving any Auto-Brightness challenges. This process ensures that your iPhone’s display remains adaptable and optimally attuned to varying lighting conditions, enhancing your overall user experience.
9. Quit iOS Beta Version
Keep in mind, though, that beta versions can have bugs. While you’ll enjoy Apple’s new features, be ready for some hiccups. Experiencing issues like screen brightness problems after testing the iOS 17 beta? It might be time to switch back. Follow these steps to leave the iOS beta version and stop getting beta updates:
1- Launch the Settings app and go to the General section.
2- Choose Software Update from the menu.
3- Now, tap on Beta Updates.
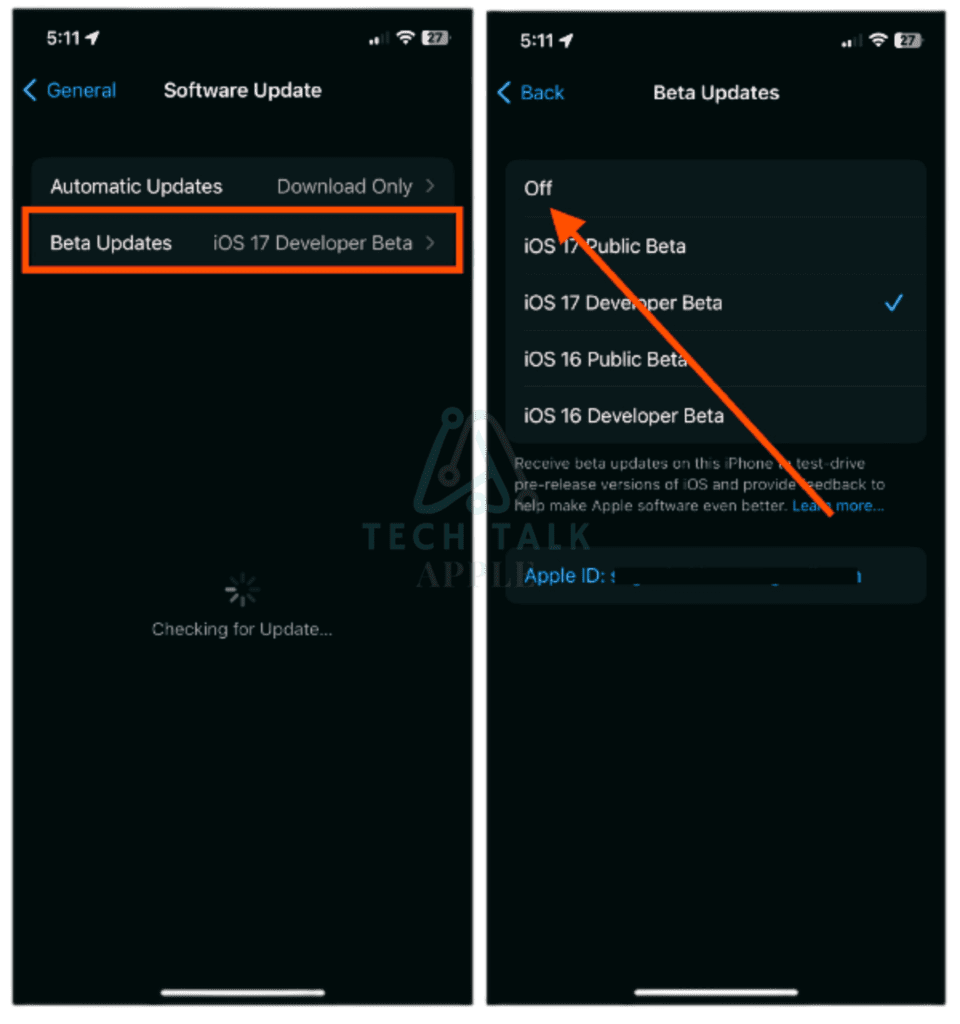
4- To stop receiving beta updates, simply select the Off option.
10. Reset All Settings
Tailoring your iPhone settings to match your preferences is a wonderful endeavour, but it’s crucial to understand that specific adjustments could unintentionally clash with other features. One potential casualty of such customization might be the Auto-Brightness function, which could find itself caught in the crossfire of your changes.
The solution? A settings reset could be just what the doctor ordered! Fret not; this process is a simple matter of revisiting your favourite settings. The cherry on top: Your cherished iPhone won’t shed a tear over lost data or files during this reset. If you’re eager to embark on this journey, follow these steps to reset all settings:
1- Open up the iPhone Settings app and head over to the General section.
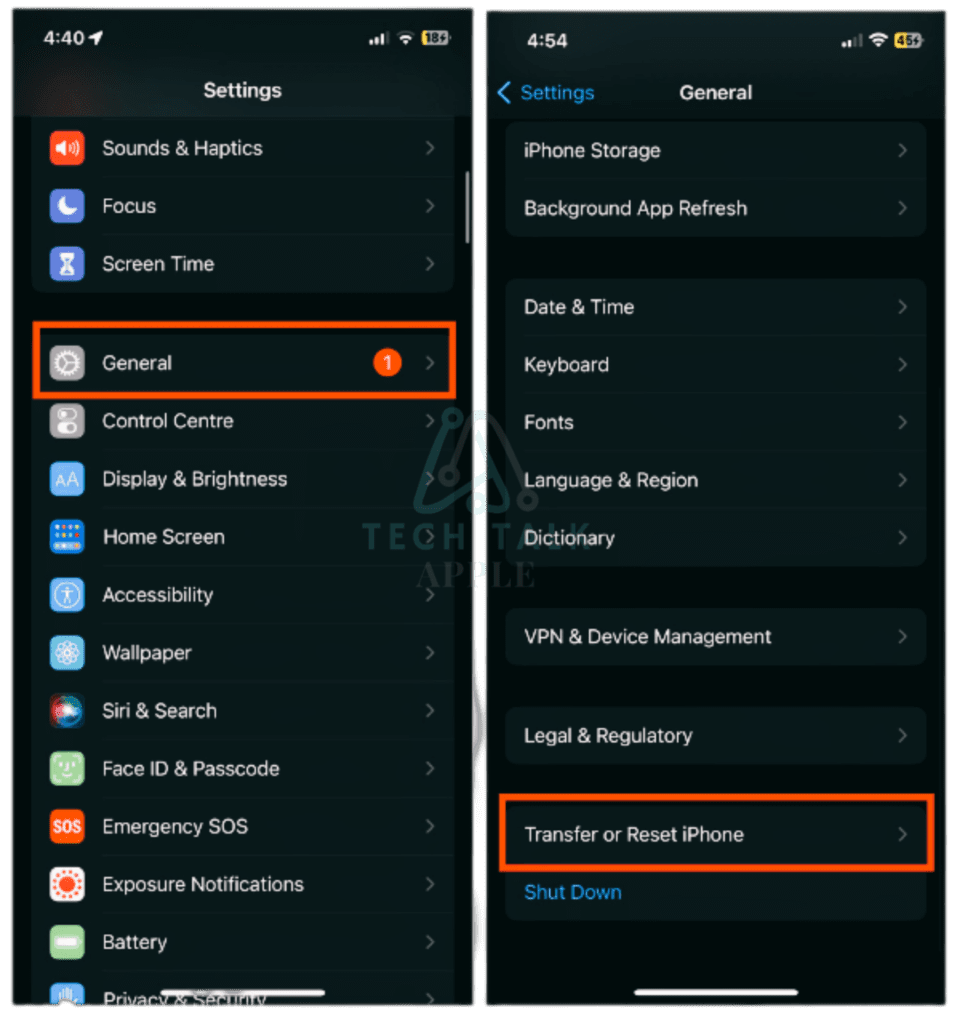
2- Locate and tap on the Transfer or Reset option, found at the lower part of the General settings menu.
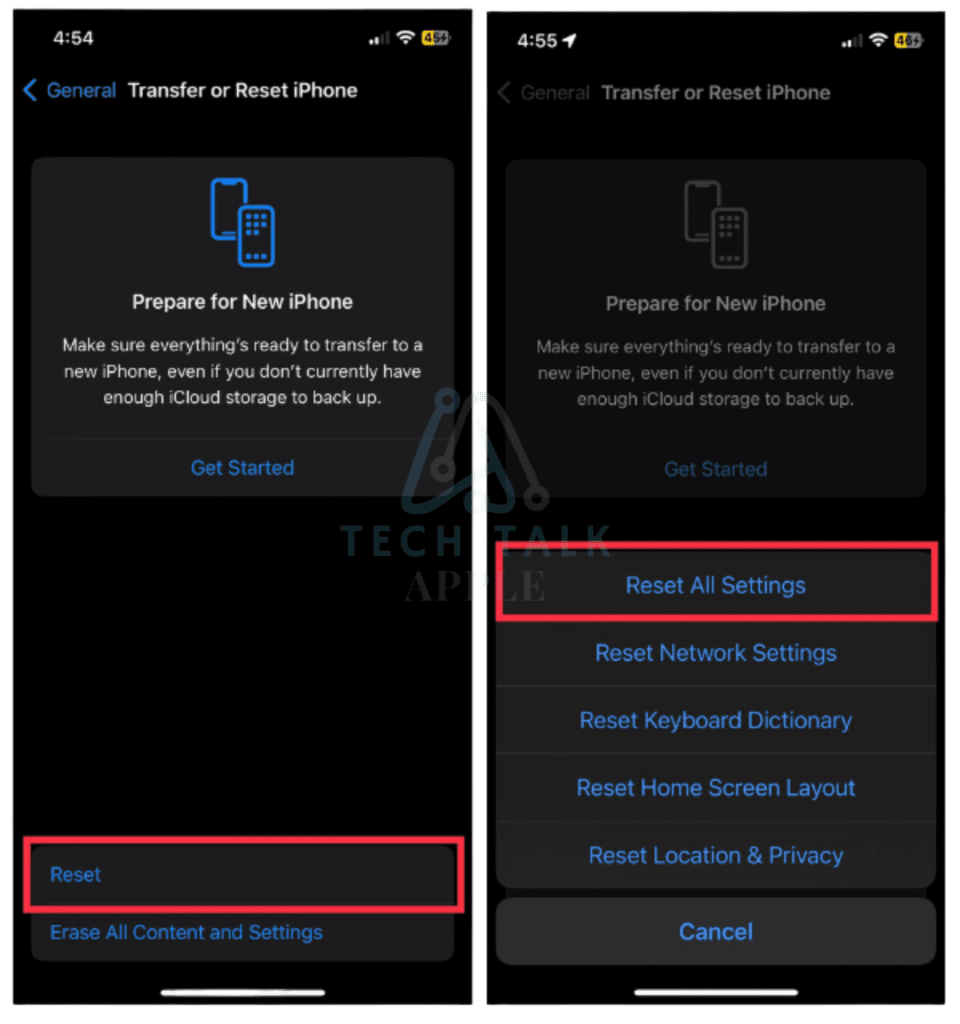
3- From the subsequent menu, select the Reset option.
4- Opt for the Reset All Settings feature to kickstart the process.
5- As the final step, provide your iPhone passcode, and watch as the reset gets underway.
After resetting all settings to their defaults, simply disable and re-enable Auto-Brightness. This will ensure smooth functionality going forward without any problems.
11. Is Your iPhone Screen Display Original?
A significant concern arises for individuals who have opted for budget-friendly alternatives for their iPhone screen replacement through third-party service providers. This issue is commonly encountered by customers who seek cost-effective solutions from such vendors.
It’s worth noting that replicated screens often suffer from compromised functionality, reduced capacitance, and diminished brightness levels. Moreover, the utilization of essential features like True Tone and Night Shift might be restricted or even rendered inaccessible on these replicated displays.
For those seeking assurance regarding the authenticity of their iPhone display, several key indicators can be considered. Should you encounter any of the aforementioned complications, it is highly advisable to contemplate replacing the duplicate display with an authentic one to reinstate optimal performance and feature accessibility.
12. Contact Apple Support
When grappling with obstinate malfunctions in your iPhone that prove resistant to self-resolution, don’t disregard the ultimate option: Apple Support. This resource wields formidable capabilities to effectively tackle and resolve a myriad of bugs plaguing your device. When personal efforts fall short, harness the wisdom of their proficient Support team for a definitive solution.
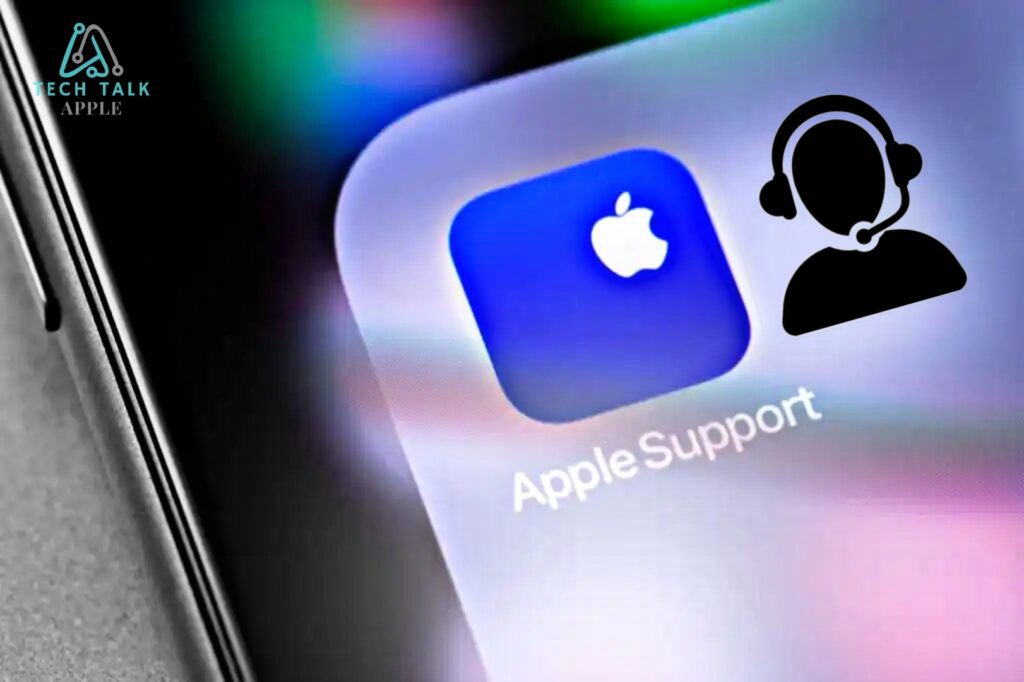
Embarking on this route necessitates a straightforward journey to their website, where a diverse array of communication channels beckon. Your preferred mode of interaction encompasses choices like telephone calls, email correspondence, and instant chat. Selecting your conduit of communication sets the stage for a seamless exchange of insights.
Precise articulation is pivotal; ensure a lucid exposition of the luminance concern afflicting your device. Detail the systematic troubleshooting endeavours you’ve undertaken, providing invaluable context for their diagnostic process. If proximity favors your cause, a face-to-face encounter awaits at a nearby Apple store, facilitating a comprehensive assessment of your iPhone’s well-being. Embrace the empowerment of Apple Support, your paramount ally in vanquishing iPhone tribulations.
Best Tips to Make Your iPhone Screen Brighter
Take Control of Brightness:
When automatic brightness falls short, empower yourself by adjusting it manually. A simple swipe down from your screen’s top-right corner unveils the Control Center, allowing you to tailor brightness using the slider. This ensures your display meets your exact needs.
Strategic Dark Mode Usage:
While Dark Mode extends OLED battery life, it could potentially dim your screen. Strike a balance by employing Dark Mode thoughtfully – reserve it for scenarios requiring battery conservation and seamlessly switch to standard mode for a brighter view.
Fine-Tune App Brightness:
Uncover app-specific brightness settings that can override general device configurations. To combat brightness challenges effectively, explore these unique app settings for a personalized luminosity solution.
iPhone Auto Brightness: Frequently Asked Questions (FAQs)

Why isn’t my iPhone’s Auto-Brightness functioning correctly?
Encountering Auto-Brightness glitches? This can stem from software anomalies or conflicting settings. Follow our tailored troubleshooting tips for effective solutions.
How do I troubleshoot Auto-Brightness problems on my iPhone?
Initiate your remediation process by toggling Auto-Brightness off and on via Settings. Reach Accessibility > Display & Brightness, disable Auto-Brightness, wait momentarily, then reactivate. If the snag lingers, expedite resolution through an iPhone restart.
What if the Auto-Brightness hitch persists post-restart?
Unyielding issue? Ensure your iPhone has the latest software update. Obsolete software might clash with features. Uphold optimal functionality by updating to the latest iOS iteration.
Can certain apps impact Auto-Brightness settings?
Absolutely, specific apps can wield dominance over Auto-Brightness settings. Gauge consistency across apps, and delve into app-specific brightness configurations within your device settings.
Does Dark Mode influence Auto-Brightness behavior?
Dark Mode’s impact on luminosity perception is notable, yet direct Auto-Brightness functionality remains largely separate. Experimentation between Dark Mode and standard mode may influence overall brightness encounters.
Can ambient light sensor woes affect Auto-Brightness?
Definitely, a misbehaving ambient light sensor can disrupt Auto-Brightness precision. Ensure an unobstructed, clean sensor. If issues persist, expert intervention through Apple Support is advisable.
Is an Auto-Brightness setting reset possible?
Presently, individual Auto-Brightness resets are absent. A comprehensive reset necessitates the reset of all iPhone settings, reinstating defaults across the board.
Seeking professional aid for tenacious Auto-Brightness woes?
Certainly, for persistent issues, enlist Apple Support’s proficiency. Their adeptness at diagnosing underlying technical complexities ensures steadfast solutions.
Keep in mind that simple troubleshooting often rectifies Auto-Brightness woes. But when hurdles persist, adept guidance leads to holistic resolutions.
Conclusion
Benefiting from the automated adaptation of your device’s brightness to match surrounding light levels offers immense utility. This feature minimizes battery usage, obviates the need for manual tweaks, and enhances overall user satisfaction. Still, a sizable segment of users derives satisfaction from hands-on brightness adjustments.
Should the Auto-Brightness feature falter, proactive steps include restarting your iPhone, ensuring the cleanliness of the ambient light sensor zone, and deactivating additional brightness functionalities. To optimize your display and brightness, keep these strategies in mind. Your seamless illumination experience awaits!